Methods for teaching lead climbing safely
A few weeks ago, I participated as an observer at the pedagogical exam for Rock Climbing Instructors. In the Swedish system (which adheres to UIAA standards), this is the second and final step in testing soon-to-be instructors. It is preceded by a two-day technical exam, so the candidates are already cleared in terms of technical competency.
At the pedagogical exam, candidates get to plan and execute, completely independently, a real climbing course with real participants. As an examiner, or in my case observer, this is a fantastic opportunity to spend a weekend watching, analysing, and thinking about various methods used by instructors who have seriously considered every minute of their day.
Because the challenge this time was to hold a lead-climbing course, a very specific issue rears its head. How do you teach lead climbing as safely and efficiently as possible? Lead-climbing, after all, requires the student to be on the wall, in exposed terrain. I saw various solutions, all of them good, and gave some thought to when to use what method.
Let´s first consider the options. (If you have additional suggestions, please comment and I can add them!) They all have their pros and cons, and we will look at various factors further on in this post.
+ 100% safe
+ Doable without instructor
+ The student can quit and come down at any time
- Requires rigging of one anchor.
- Requires two ropes
- No psychological realism, cannot test gear
- No real belay work
+ 100% safe
+ Instructor can focus on checking belay technique of the person on the ground
+ The student can quit and come down at any time
- Requires rigging of one anchor.
- Requires two ropes
- Hard to inspect gear on the fly, since the instructor is on the ground
- No psychological realism, cannot test gear
+ Simple, no pre-rigging required (an anchor or preplaced gear can help)
+ Realistic
+ Second gets to belay for real (but instructor is not close)
+ Easy to check gear
+ Easy to coach
+ Easy to provide backup safety
+ No extra rope disturbing the climber
- Safety only for one climber at a time
- Cannot bail at any time
+ Safety for multiple lead climbers, the instructor can shift focus
+ All climbers can lead at same time
- Questionable safety unless a backup knot is tied or two devices used.
- Requires special equipment
- Requires extra rope and extra anchor
- Harder to get down, but can bail by putting gri-gri on clog rope.
+ Should be managed by competent climber, using gri-gris and backup knots
Hopefully, this example will help you plan your own course using all the tools at your disposal, to gain efficiency and safety, and ultimately providing training that is relaxed, fun, and productive. Good luck!
At the pedagogical exam, candidates get to plan and execute, completely independently, a real climbing course with real participants. As an examiner, or in my case observer, this is a fantastic opportunity to spend a weekend watching, analysing, and thinking about various methods used by instructors who have seriously considered every minute of their day.
Because the challenge this time was to hold a lead-climbing course, a very specific issue rears its head. How do you teach lead climbing as safely and efficiently as possible? Lead-climbing, after all, requires the student to be on the wall, in exposed terrain. I saw various solutions, all of them good, and gave some thought to when to use what method.
Let´s first consider the options. (If you have additional suggestions, please comment and I can add them!) They all have their pros and cons, and we will look at various factors further on in this post.

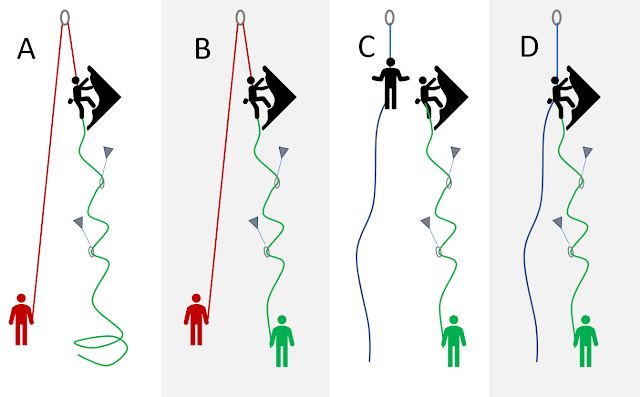
A) Top rope, trailing the lead rope
Here, the student is simply top-roping (on the red rope), while belayed by her partner. The student places gear as she climbs, and clips an additional lead rope (green), which is not being belayed by anyone. A more experienced climber or instructor can top-rope directly after and provide feedback on the gear.+ 100% safe
+ Doable without instructor
+ The student can quit and come down at any time
- Requires rigging of one anchor.
- Requires two ropes
- No psychological realism, cannot test gear
- No real belay work
B) Lead climbing, backup on top-rope
Here, the student has a top-rope for backup (red rope), belayed by a third person, such as the instructor. The student places gear as she climbs, and clips the lead rope (green), which is being belayed by her partner.
+ Instructor can focus on checking belay technique of the person on the ground
+ The student can quit and come down at any time
- Requires rigging of one anchor.
- Requires two ropes
- Hard to inspect gear on the fly, since the instructor is on the ground
- No psychological realism, cannot test gear
C) Lead climbing, no backup
The student is actually leading and is being belayed on the lead rope (green) by her partner. There is no top-rope. Safety is achieved by selecting a route of low difficulty, closely inspecting the gear, and actively instructing. The instructor, who is ascending on a separate fixed rope (blue), can also pre-place (or add) some gear if needed, or create a temporary extra safety by clipping a sling from herself to the lead rope.
+ Realistic
+ Second gets to belay for real (but instructor is not close)
+ Easy to check gear
+ Easy to coach
+ Easy to provide backup safety
+ No extra rope disturbing the climber
- Safety only for one climber at a time
- Cannot bail at any time
D) Trail lead rope, safety through clog backup
Here also, the student is leading (green rope), but receives additional safety by employing a clog setup (blue rope). It can be done with no belayer, in which case the clog setup requires some bullet-proof backup (such as double devices, or a backup knot).
+ All climbers can lead at same time
- Questionable safety unless a backup knot is tied or two devices used.
- Requires special equipment
- Requires extra rope and extra anchor
- Harder to get down, but can bail by putting gri-gri on clog rope.
Multiple top-ropes managed by one person
+ 100% safety+ Should be managed by competent climber, using gri-gris and backup knots
Comparing the methods
The main factors to look at are:
- Safety. Any system must be absolutely safe.
- Efficiency. How many students can you teach at once? How much rigging is involved?
- Psychological realism. Does this feel like the real thing?
"Psychological realism" needs a few extra words. Notably, both students and instructors tend to accept sub-optimal gear placements more often when there is a top-rope backup, and this may result in sloppiness further on during a course. Knowing that you may actually fall on a piece of gear tends to sharpen the focus.
As we can see, there are trade-offs to be made. For example, "real" leading might be the best learning experience but is not as safe as top-roping, and a single climber requires the full focus of the instructor.
It is important here to consider what we are trying to achieve. Are we trying to just provide a basic understanding of how lead climbing works? Do we want to work on belay technique? Gear placement? Also, how many students do we have, and what level of efficiency do we need? If we have half the group on the ground belaying, and they already know how to do this, this may just be boring and cold.
Combining methods for progression and efficiency
It is my belief, that by combining methods for safe lead climbing, we can create a safe and productive progression. Let´s assume you are alone with a group of four climbers, who have some basic skills, like building top-rope anchors, tying in, and belaying a top-rope. You may want to talk briefly about placing gear on lead before you start the actual climbing.
1. Lots of activity and highest safety
Let´s start by getting everybody climbing! Give the climbers a top-rope each (if there are routes enough). Leteach person trail a fake lead rope, and pretend they are leading. Build a super sturdy bottom anchor (bolts, a tree, etc) and belay all four top-ropes from this using four gri-gris. It is important to make backup knots, because you cannot safely handle all four ropes at the same time!
Tell your students to place the best gear possible wherever they can. Make it a goal to use the whole rack!
This provides a warm-up, allows you to gage the climbing skills of your students, and to make sure they are capable of doing the climbs. With this information, you may want to swap routes between students so that the strongest climber gets the hardest route.
This exercise assumes that there are enough routes in a small area, which is perhaps unusual. If there is not, go directly to the next exercise.
2. Add belaying
Now you want to make sure the students know how to belay properly. If they are new to this, you may want to start with some instruction on the ground, but if they have belayed lead climbing indoors, jump right into it.
Using the same setup as above, have only two climbers lead climb, while the other two belay the lead ropes. You are still backup-belaying on the top-ropes using two gri-gris off a fixed point. Keep making those backup knots.
Tell climbers to only use the best placements from the previous exercise, and to consider how far apart they would space their placements. If a climber seems comfortable, try letting them "fall" on their own gear, with a little slack in the backup top-rope. This also allows the belayer to get a feel for catching falls. Try increasing the length of falls a little!
While doing all of this, watch the belayers carefully, and give advice on technique.
3. Everything at once
Now it´s time for some real leading. First, take one team and have them practise as a top-rope team, where the leader trails a fake lead rope. The team should be where you can see them, but they are otherwise independent. Since they are likely faster than the second team, they can, for example, inspect each other´s placements and give feedback.
The second team is the team you should focus on. One person will provide live belay. Make this very clear. The other will lead, placing actual gear. Make a point of the fact that this is now for real, but that you will be there to guide.
As an instructor, ascend on a separate, static, fixed rope. Let the climber do as much of the work as possible, but check all gear placements, give feedback, and add gear if needed. Also, make the climber place a lot of protection! Adapt to the personality, confidence, and skill of the climber. It is important that it is an easy climb, because the idea is to be so relaxed that there is plenty of time to make that protection perfect, and have fun.
Don´t forget to involve the belayer. Make sure she uses the correct technique, but encourage her to give beta, advice on reducing rope drag, provide a warning if the climber is getting run-out, and so on. This makes it more of a team effort, as it should be! Talk about communication, giving slack at the right time, the problem of placing high gear, etc.
If the climber is looking sketchy, you have several options.
- Provide "spotting" by getting in behind the climber if he seems nervous, out of balance, or is on a poor foot-hold.
- Secretly connect a sling from yourself (your harness or your ascending device) and the lead rope just under the climber. This becomes an extra piece of protection, but the climber will still fall a short distance if he falls!
- If the climber is scared or pumped and needs to rest, and is far above his last piece, connect the same sling directly to his harness. Let him know it is safe to lean back and rest.
To speed things up, instead of building an anchor at the top, have the climber clip into a pre-placed top-rope anchor and be lowered. Clean the gear together and talk about how this is best done. When the first leader is on the ground, rotate the whole group. In the end, everyone will have belayed a leader, belayed a top-rope, climbed on their own gear, and climbed on a top-rope.
Hopefully, this example will help you plan your own course using all the tools at your disposal, to gain efficiency and safety, and ultimately providing training that is relaxed, fun, and productive. Good luck!
Comments
Post a Comment